In SharePoint 2010, site templates are now saved as a WSP files. In addition, the new SharePoint tools for Visual Studio 2010 allow the contents of a WSP to be selectively imported. This allows the developer to quickly setup new SharePoint content using the SharePoint web UI or SharePoint Designer 2010. When the developer has gotten as far as possible with the SharePoint web UI or SharePoint Designer 2010, the structure can be imported into Visual Studio to add customization. The approach has saved me a great deal of time.
Here is how to do it:
1) Do as much design right in the SharePoint web UI and SharePoint Designer as possible until ready to transfer the work to Visual Studio.
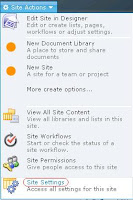
2) Click on the Site Actions in the upper left hand of the sites root page. Select Site Settings from the drop down.

3) Under the heading Site Actions click on Save site as template

4) The Save Site as Template page should appear
a. Enter the File name for the template. Do not add the “.wsp” to the name as it will be added automatically later at download.
b. Add the Template name and Template description.
c. If custom pages have been created select the Include Content option. Custom pages created in the web UI or SharePoint Designer and placed them in Document libraries can be saved with the library by selecting this option. Note that selecting this option also includes a lot of other content data that may generate more cleanup work when importing into Visual Studio.
d. Click OK to save the template
5) Once the site template has been saved it will appear in the User Solution Gallery (at the site collection level). This is the location where the new SharePoint 2010 Sandbox Solutions are loaded and deployed. Upon completion, click on the link provided to the user solution gallery.
6) At the user solution gallery, do not activate the template. It is only passing through this location on its way to Visual Studio. Download the template simply by clicking its name
7) Start Visual Studio 2010. Click on New Project…
8) In the Installed Templates pain on the left select Visual C#->SharePoint->2010. Then select Import SharePoint Solution Package. Enter the name and location and then click OK.

9) At the prompt for the template file, browse and select the WSP file.
10) VS gives the opportunity to select what components within the WSP that are desired to be import into the project. This is where the real power of the tool lies. It is possible to import as little as a single field or list definition, or as much as the entire site template. If selectively importing only a portion of the WSP, it may take several tries to get the right combination of components to satisfy component dependencies. In general, if customizing on top of a common template such as Team Site parts like the common column definitions need not be imported, only the custom columns. Also, as far as I can tell, the property bags associated with the objects would rarely be needed.
11) After import there will be a project with a number of features and modules and other SharePoint components. The import makes no attempt to manage component dependency. Turning around to build and deploy the new project may not work. Check the packaging to ensure that components are deployed in the correct order to satisfy any dependencies. This can take some time if there are a lot of lookup fields defined in the project.
This approach lends itself to what I call the minimize costs methodology for SharePoint:
- Customize in the SharePoint Web UI to the maximum extent possible.
- Then, customize in SharePoint Designer to the maximum extent possible.
- Finally, turn to Visual Studio for anything that could not be handled in the previous two approaches.

No comments:
Post a Comment